I lucked out and found a HUGE lot of vintage upholstery tacks and thought they would be the perfect thing to spruce up these plain pumpkins. And ya know what.....I LOVE them! I already have my black pumpkins ready to go for Halloween. Gonna add a spider web design in vintage nail heads. I think it's going to be so cute!
Friday, September 23, 2011
"Bedazzled" Fall Pumpkins
Decorating with white pumpkins is one of my favorite things to do in the fall. I put a cluster of varying sized white pumpkins in my dining room and as much as I loved it, I just felt it was a tad blah.  I lucked out and found a HUGE lot of vintage upholstery tacks and thought they would be the perfect thing to spruce up these plain pumpkins. And ya know what.....I LOVE them! I already have my black pumpkins ready to go for Halloween. Gonna add a spider web design in vintage nail heads. I think it's going to be so cute!
I lucked out and found a HUGE lot of vintage upholstery tacks and thought they would be the perfect thing to spruce up these plain pumpkins. And ya know what.....I LOVE them! I already have my black pumpkins ready to go for Halloween. Gonna add a spider web design in vintage nail heads. I think it's going to be so cute!


Sunday, September 18, 2011
Precious Time...
It seems we are all so busy these days. And even though technology can make things easier for us, I also feel it makes things busier for us. I think about time a lot and how quickly it goes by...right in front of your eyes....poof!!
I finally took the time to take down all the summer coral and sea shells and start thinking about fall. Here by my front door, I did a very simple display with vintage clock faces and my vintage # 5 collection. I love the number 5 because it represents my 5 children. I can't believe how quickly they are growing! And paired with one of my favorite quotes, it's a great daily reminder to sometimes stop everything that keeps us so busy and embrace the time we are so blessed with here on this Earth.
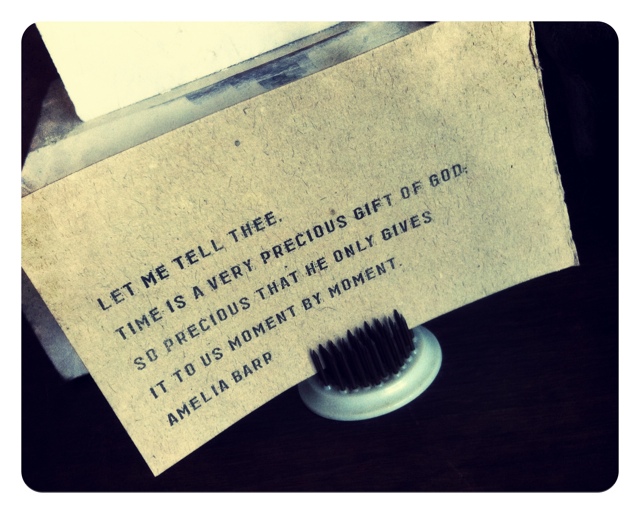

I finally took the time to take down all the summer coral and sea shells and start thinking about fall. Here by my front door, I did a very simple display with vintage clock faces and my vintage # 5 collection. I love the number 5 because it represents my 5 children. I can't believe how quickly they are growing! And paired with one of my favorite quotes, it's a great daily reminder to sometimes stop everything that keeps us so busy and embrace the time we are so blessed with here on this Earth.
Walk for a Cure 2001
Headed to our first Virginia JDRF walk for a cure! We are so excited to be a part of this amazing event!! Thank you to all who have donated and supported this cause that us so dear to my heart! And thank you to all the Crimson Clover customers who support this every day!

Saturday, May 7, 2011
Burlap banner wreath
Hi all! It's been a while since I posted. As a lot of you know, our 9 year old son was just diagnosed with Juvenile Diabetes so I have been taking some time off. Now with 2 diabetic children, I haven't felt much like crafting or decorating. I thought it was time to get the easter egg wreath off of my front door...LOL...but really didn't know what to put in its place. So I had my sweet friend, Amanda make this adorable mini burlap banner for me and just added it to this wreath I had covered back in the winter with jute webbing. It's simple and I love it. Thanks Amanda!!  And thanks to my sweet sister-in-law, Andrea...my other "two junk chix" for keeping up the crafting and creating. It has really helped get my little spark back. Love you!!!
 And thanks to my sweet sister-in-law, Andrea...my other "two junk chix" for keeping up the crafting and creating. It has really helped get my little spark back. Love you!!!
xoxo,
tia
Sunday, May 1, 2011
Happy birthday wreath
 Michael's birthday was yesterday and he turned 11 years old. Happy Birthday to him!!!
 To celebrate our family's birthdays, I have a yard flag that I put out for the week of the birthday. You all know me and know I like have something on my door. I have wanted to make one of these balloon wreaths after the first time that I saw it done online somewhere. Sorry I don't know who to credit. :(
 It is really easy to make though. Sorry I didn't take any pictures of how to because I literally made it during one of Michael's baseball practices. So it doesn't take that long to make one BUT it does take a lot of balloons.
So here is what you need to create the wreath:
A wire clothes hanger
Wire cutters
Balloons in different sizes
(i used water balloons and regular size ones for mine)
(i used water balloons and regular size ones for mine)
decorations if you want to add to it
 How to:
First thing you need to do is take the wire hanger and snip off the hook part of the hanger using the wire cutters.
Next you need to shape the wire hanger into a circle and secure the loose end.
Then take the balloons and tie them to the wire. Use the smaller balloons as filler on the wreath until it is full.
Add decorations if you like.
I used a Ribbon Rosette from the Bravissimo line from Making Memories that I bought from Michael's. I punched a circle and stamped "happy birthday to you" using the AE April kit from Technique Tuesday. Then added some stickles on the edge for some sparkle.

Happy Crafting!!!!
♥
Andrea
Wednesday, March 23, 2011
Color my front door....
 I wanted to get something different this Easter for my front door. I kept looking around not really finding anything that I had to have until I saw this egg wreath at Target. It was small but I loved the brightly colored eggs and I knew that I could add something to it and make it bigger and better. I did hear that Target does have bigger egg wreaths but I never did see them at mine. My wreath was only about 10 bucks.
  Fun little carrot bunch that I got a Pier One. I think it was suppose to be an ornamnet. I think it us super cute!!! I think it was $2-3
 I added a grapevine wreath that I spray painted blue. I made a mistake when Paint shopping. I got the blue thinking it was the blue color that was actually the teal color that was in the wreath. Not a problem I popped off 3 of the eggs that were white and I spray painted them too so it all matched.
Problem Solved!!!

 Cute little banner that I made. I used some glitter carstock from American crafts in a blue-teal color. I just handcut the triangles for the banner. You need a front and back triangle for each letter if you can see your wreath from the other side like I can on mine. Glue the triangles front and backs on a cord or sting to form the banner. I embellished mine with ribbon trim, alpha stickers and brads. I used hot glue to adhere the banner. The ribbon trim and brads are from Doodlebug. Letter sticks are from American Crafts and are made out of vinyl. I used hot glue and used floral wire to hold it all togehter.
Happy Easter and Crafting!!!
♥
Andrea
Tuesday, March 1, 2011
Lucky banner
 I had this idea last year to make this wreath for St Patrick's Day and then ran out of time. That is the story of my life running out of time. lol!!! I loved the wreath last year when I saw it it at Target and was super excited when I saw it there this year too!! I ripped it of the wall and ran. Just kidding!!
 I was just going to make the banner and add it to the berry wreath until I saw the cute glittery shamrock at Target too so I picked it up to go with the berry wreath. Both were inexpensive. $15.00 for the wreath and $3.00 for the shamrock. Not bad if you ask me!
I made the banner from a piece of cardboard that I hand cut into the banner shape. Covered in burlap secured with hot glue (lots and lots of hot glue). Stamped the word lucky using foam stamps and green ink pad and hot glued that baby on the front of the shamrock.
So glad that I could get it made this year.
So glad that I could get it made this year.
 Finished wreath on my front door
 Another view of the banner!!
Enjoy!!
Happy Crafting!!
♥
Andrea
Subscribe to:
Posts (Atom)