Wednesday, January 30, 2013

Project LIfe

 
Thompson Family Album 2013
 
I love memory keeping and this year I plan on better job at it. 
This year I am doing Project Life.  This will be my 2nd year scrapbooking this way.  If you dont know what it is,  Project Life is a weekly approach to scrapbooking and documenting everyday life through photos and journaling.  In one word "simplify" the process . You can read about Project Life HERE.
 
 
 I have been scrapbooking 15+ years and I have fallen in love with Project Life.  I love caputuring the everyday moments along with big moments in our family lives.   I still like to add a few 12x12 pages in my album along with the photo pages.   
In the future, I plan on sharing my weekly pages with you.  Right now I'm playing a little catch up and will share all of my weekly pages soon.
   
This post I thought that I would share mainly how I store my cards and supplies for Project Life.  I like to be very organized when I'm working.   I need to be... my room is multi-project necessary.   I craft here, scrapbook here, make jewelry here, and BLOG here.  I love my room and I have made the best of the small space that I have.
The above picture is my desk space.  My dad gave me a pop-up 6 foot table that I work on.   The Cube Storage that is along the back of the desk I picked up at Michael's.  The 2 on the ends of the desk are what I store my Project Life supplies in.  
 What I love most about the cubes they came with dividers in the drawers.  Easy built in organization and the cubbies fit the cards perfectly.
 I store embellishments and stickers in this cube's drawers.  This cube has long drawers perfect for letter stickers.
When I'm working on my desk I can have the drawers pulled out on the ends and work in between the drawers.  I love that everything is organized and I can be more productive while working. 
Project Life page....a work in progress
Thompson 2013 Project Life Title Page
Project Life Seafoam Edition
Amy Tangerine Album
 
 
Happy Memory Keeping
Andrea and Tia

Heart Canvas

When I was at Tia's last month,  I made a canvas too with the left over Fabric and Upholstery Tacks that Tia used on her project as seen here http://twojunkchix.blogspot.com/2012/12/upholstery-tack-canvas-art.html
 
I thought it was a simple take on her project and it was fast to make.   I created it the same as Tia did in her project attaching the fabric to the canvas.  I traced a heart shape on the fabric and pushed the tacks in and viola instant Valentine Art. 


XOXO
Andrea & Tia

Thursday, January 10, 2013

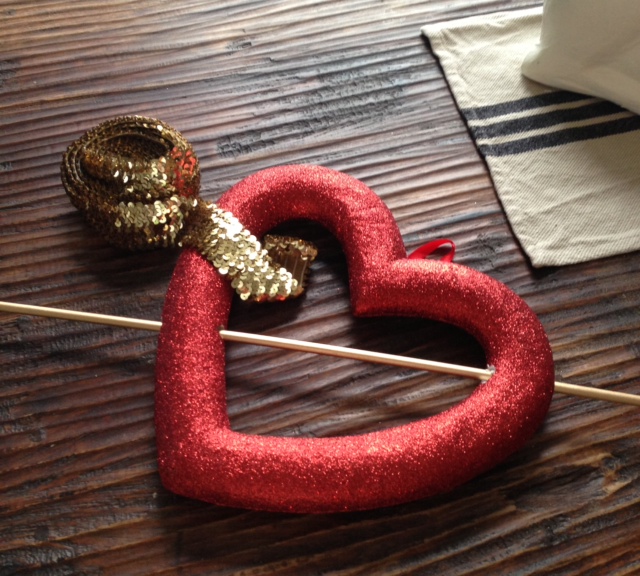
Heart with Arrow Wreath

As Valentine's Day is fast approaching, Andrea and I thought we should get a jumpstart on a Valentine craft.  I was searching for inspiration online and came across a wreath on Google that was pink sequins and I loved it!  So we decided to try our had at these wreaths and decorate them to meet our individual taste.


Supplies:
heart shaped wreath form
dowel rod
feathers
glitter & glue
paper
sequins, tulle, or ribbon


When I was a little girl (see photo below....yep, that's me), I truly thought I was going to grow up to be a Solid Gold Dancer.  I was so fascinated by them!  So I decided to do my wreath in gold sequins.  We found these styrofoam wreath forms at Hobby Lobby.  Using a dowel rod, we poked it through the wreath form in a diagonal as if cupid himself shot right through it.  Then you start wrapping the wreath form in whatever you'd like to cover it with.  My next one will be burlap. Andrea used red tulle for hers.


We've been seeing these glitter tipped feathers all over Pinterest so we decided to add these to the wreath, as well.  Using glittering glue, just paint the tips with the glue and pour your glitter on them.  I used gold and Andrea used red on hers.

Using the standard accordion fold technique, we added lollies to cover up the bottom of the feathers.  Andrea used shredded paper behind her lollie that was left over from our garland project and I used pink paper fringe behind mine.  


We cut out triangles from vintage paper and hot glued them to the tip of the dowel for the arrow's point.  We then used the rest of the feathers (I had to cut mine shorter) as the bottom of the arrow...attaching them with hot glue.


Tia's ode to the groovy Solid Gold Dancers
&
Andrea's classic red Valentine version


Happy crafting and giddy up!!
tia & andrea


Tuesday, January 8, 2013

Genius ornament stoarge!


Ok so this isn't a twojunkchix original idea at all but I have to share it with everyone!!!   I got the idea from pinterest (from mom's party cafe savvy tips) for this ornament storage!!!  It is pure genius and cheap to make one yourself!!! 
 
I finally got all my trees down this past weekend.  I had pinned the idea months ago and knew I wanted to utilize this idea when I was  packing up and storing my ornaments until next year.  So much easier than sticking them back in the cardboard plastic tray that they originally came in. 
 
This is what you need:
Tote
cardboard or foam core board
plastic drink cups
hot glue gun
glue sticks
 
 
 Cut the cardboard box to fit in the tote.  Glue the cups down to the cardboard.   Fill the cups with ornaments.   Then make the next layer of cardboard with cups.  I was able to get 3 layers in my tote and stored 100+ ornaments in one tote.


I love to share anything that makes life easier!


Love Andrea & Tia

Monday, December 31, 2012

Ringin' in the New Year TwoJunkChix Style!!


As usual, when Andrea and I get together, we craft.  She came down to Virginia to visit and we made these *unique* garlands that we wanted to share with all of you.  We just love how they turned out!


You are NOT going to believe what they are  made out of!!  We had fun with out Facebook friends trying to guess what medium we used.  We had some great guesses, like fleece, felt, wool, and fabric but we used none of those.  We used something so basic that every household has.......we used paper towels!  To be exact, we used Viva brand paper towels because they feel more like fabric.


Since they are basic white and as much as we love white, Andrea knows how much I love gray, we dyed a bunch of them gray, too.  {We used Rit Dye in Pearl Gray} To get them to dry quickly, my wonderful husband, Brian gave us the idea to dry them in the microwave.  We did this in 30 second intervals.  
Here is how we made "flowers" from the paper towels.  We cut them in half longwise and layered 3 sheets on top of one another.  Then we folded them accordion style, tied the center with jute twine and then started fluffing and fanning them out.  

We purchased garden craft lights because we liked the brown cord as opposed to white or green.  We then tied our paper towel flowers to the light strand.  We wanted to make our lighted garland a bit more fluffy, so we cut strips of paper, strips of paper towel, and accordion folded natural coffee filters and tied them together with jute twine.  We tied them in between the flowers for a fuller effect.

Here I am getting my craft on!  


Here is Andrea getting her craft on!  She is going to share her garland with y'all when she gets back to WV.


Happy Crafting in 2013!!!
tia & andrea


Thursday, December 27, 2012

Upholstery Tack Canvas Art


 Valentine's Day is going to be here before we know it so I wanted to get a jump start on a new craft.  I like to do projects that don't scream the specific holiday so you can utilize them all year long.  Everyone knows how much I just LOVE chevron and I found this beautiful red and cream chevron duck fabric that I have been wanting to use.


♥ ♡ ♥


I cut the fabric 1-1/2" larger than the canvas size I used and stapled it to the wooden frame of the canvas.  Since I used upholstery tacks that have a longer shaft, I hot glued a thick piece of foam core board to the back of my canvas so the tacks wouldn't poke through.  You can also do this with thumb tacks that have a shorter shaft but since I had these gorgeous upholstery tacks on hand, I decided to use them.


Using a stencil, I positioned my letters on the fabric covered canvas and drew them out using a pencil.  Now the fun part is pushing all the upholstery tacks in to fill in your stencil.  I had to use a hammer on some of these to get them through the wooden frame.  


I could have just left it alone but I wanted to take it one step further and glittered an old wooden clothes pin with silver glitter and hot glued it to the top of the canvas.  Now is houses this adorable black and white photo of my 5 kids.  You can change out your pictures or clip an old Valentine card on it.  I'm working on some more that say XOXO using pink and white striped flannel fabric.  LOVE!!!

Giddy up!!
tia & andrea


Wednesday, December 26, 2012

➽ ➽ ➽ Happy 2013 ➽ ➽ ➽

Hope all of you have had a very Merry Christmas.  I'm looking forward to the New Year!!  Andrea and the rest of my family will be here tomorrow night and I am so excited!!  So I decided to make this adorable New Year's centerpiece to welcome them as we ring in 2013 together.


Using vintage ledger paper, dowels with glittered wooden balls on the ends, vintage enamel watch faces, tinsel and number stickers, I was able to create this whimsical centerpiece of flags, lollies, and a party hat.  I just love how it turned out!  I think I'll keep it out the entire month of January.  


Using my go to vase of sugar, I felt it needed one more thing so I added 2 vintage clock faces that I've had in my decorating stash for years now.  I just love clock and watch faces and they are perfect for a New Year's theme.


happy new year and giddy up!!
tia & andrea


Related Posts with Thumbnails